|
Gradients
PowerPoint 2007 has given us some awesome looking shapes
complete with gorgeous fills and effects.
The built-in Quick Styles are beautiful, but sometimes I just need a simple
gradient fill.
PowerPoint 2007 gives us a good-looking default gradient, but it doesn't give us a good
interface to easily modify or create gradients.
So, I figured a quick tutorial on creating gradients in PPT might be worthwhile. These
tutorials were created using PowerPoint 2007's "Office" Theme colors.
It's also helpful to know
that closing and reopening
PowerPoint resets the default gradient fill back to the 3-stop gradient based on Accent 1 of the
Theme color set. So if you manage to royally mess up your gradients and all you
can do is apply ugly gradients (Can you tell I've done exactly that more than
once?), just close and reopen PowerPoint to get back to ground
zero.
To begin each tutorial, follow these steps:
1. Insert
| Shape, choose Rounded Rectangle, click and drag on the slide to make a big rectangle.
2. On the Drawing Tools Format
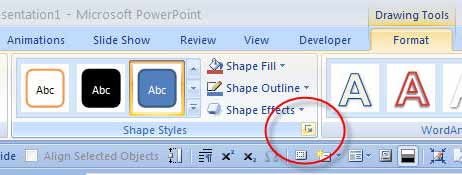
ribbon in the Shape Styles group, click the Format Shape dialog launcher. (It's
that tiny little square you see circled in the image below.) This opens the
Format Shape dialog box.
3.
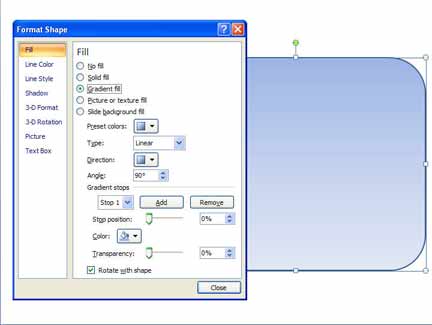
Select the rectangle and, in the Format Shape dialog box,
on the Fill tab, click the radio button next to Gradient fill. The
rectangle will automatically fill with the default gradient, which is
based on Accent
1 of your Theme color set.
Now
you're ready to begin each tutorial. 3-color gradient based on a Theme color
2-color gradient based on a Theme color
3-color gradient based on a color not in the Theme
2-color gradient based on a color not in the Theme
Semitransparent
gradient
3-Color Gradient Based on a Theme
Color
PowerPoint starts you out with a nice
3-color gradient based on Accent 1 of your Theme colors.
To see it, add a shape to your slide and give it a gradient fill. Follow steps 1-3 above if you
don't know how to do this. 4. Make sure Gradient stops dropdown is on Stop 1 and open the color picker below it. Choose
the Accent 2 color. 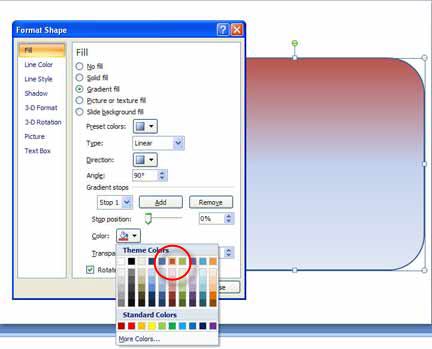
5.
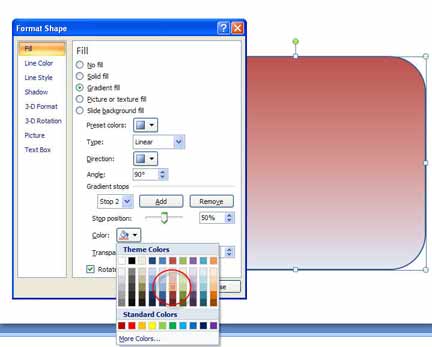
Click the stop dropdown and choose Stop 2. The stop position slider will jump to 50%,
meaning it's halfway across the shape. 6.
Open the color picker and choose the Lighter 40% fill of Accent 2.
7.
Click the stop dropdown and choose Stop 3. The stop position slider will jump to 100%,
meaning it's clear on the opposite side of the shape.
8.
Open the color picker and choose the Lighter 80% fill of Accent 2.
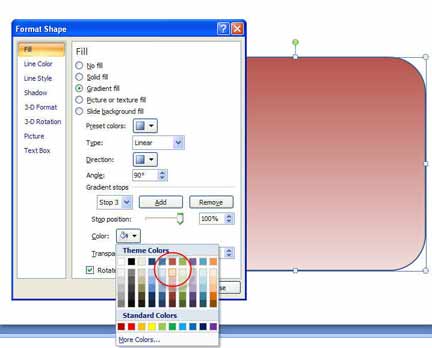
This same technique will work for any of the Theme colors.
(back to
gradient tutorial links)
(back to
top)
2-Color
Gradient Based on a Theme Color
PowerPoint starts you out with a nice
3-color gradient based on Accent 1 of your Theme colors.
To see it, add a shape to your slide and give it a gradient fill. Follow steps 1-3 above if you
don't know how to do this.
4. Choose Gradient Stop 3 from the Gradient stops dropdown. Click Remove.
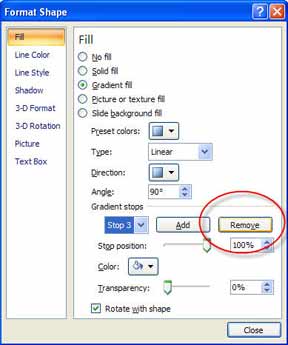
5. Choose Gradient Stop 1 from the Gradient stops dropdown.
6. Open the color picker and choose Accent 2.
7.
Choose Gradient Stop 2 from the Gradient stops dropdown.
8. Move the stop position slider to 100%.
9. Open the color picker and choose the Lighter 80% fill of Accent 2.
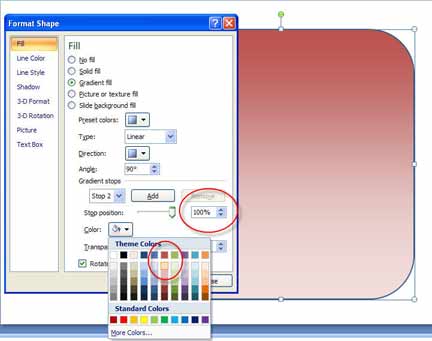
This
isn't quite as smooth as the 3-stop gradient, but it's close.
(back to
gradient tutorial links)
(back to
top)
3-Color
Gradient Based on a Non-Theme Color
PowerPoint starts you out with a nice
3-color gradient based on Accent 1 of your Theme colors.
To see it, add a shape to your slide and give it a gradient fill. Follow steps 1-3 above if you
don't know how to do this.
4. Make sure Gradient stops dropdown is on Stop 1 and open the color picker below it. Choose
More Colors at the bottom of the color picker. This opens the color dialog box.
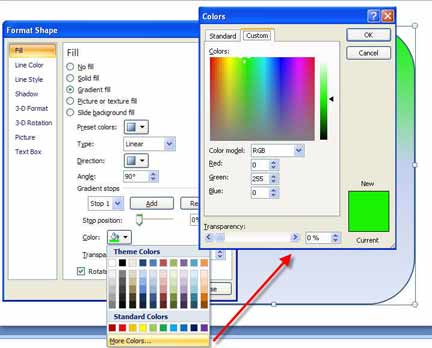
5. Specify Red 0, Green 255, Blue 0 in the Colors dialog box. Click OK to close the Colors
dialog and set the color of Stop 1 to Green 255.
6.
Choose Stop 2 from the Gradient Stops dropdown. The Stop position slider will move to 50%.
7. Open the color picker below Stop 2 and choose More Colors to open the Color dialog box.
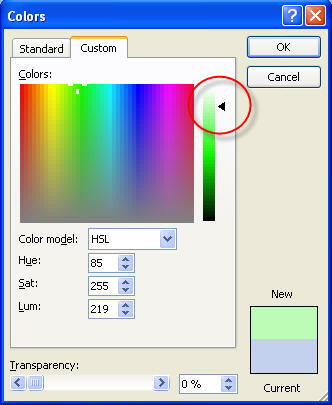
8. Change the Custom color settings to Red 0, Green 255, Blue 0. Then change the color model to
HSL. The color settings will change to Hue 85, Saturation 255, and Luminosity 128.
9. Drag the arrow upward on the slider toward white. As you do this, the luminosity setting
will change. Stop when the New green becomes a lighter color appropriate for the middle of your
gradient. Click OK.
10.
Choose Stop 3 from the Gradient Stops dropdown. The Stop position slider will move to
100%.
11. Repeat steps 7 and 8 above: Open the color picker below Stop 3 and choose More Colors to
open the Color dialog box. Change the Custom color settings to Red 0, Green 255, Blue 0. Then
change the color model to HSL. The color settings will change to Hue 85, Saturation 255, and
Luminosity 128.
12. Drag the arrow upward on the slider toward white until it becomes the lighest green you can
manage. Or type a larger number into the Luminosity settings box.
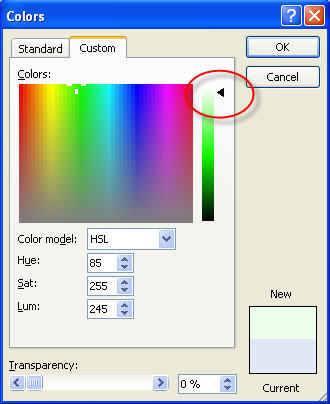
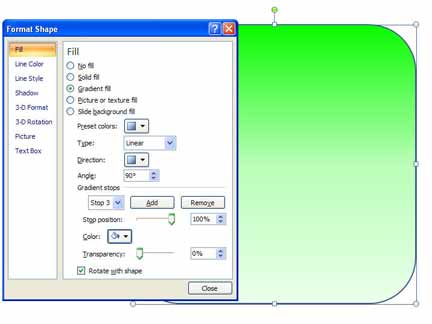
13. Click OK to apply the Stop 3 color setting and view your gradient.
(back to
gradient tutorial links)
(back to
top)
2-Color
Gradient Based on a Non- Theme Color
PowerPoint starts you out with a nice
3-color gradient based on Accent 1 of your Theme colors.
To see it, add a shape to your slide and give it a gradient fill. Follow steps 1-3 above if you
don't know how to do this.
4.
Choose Gradient Stop 3 from the Gradient stops dropdown. Click Remove.

5. Choose Gradient Stop 1 from the Gradient stops dropdown.
6. Open the color picker below Stop 1 and choose More Colors. This opens the Colors dialog box.
7. Specify Red 255, Green 0, Blue 255 in the Colors dialog. This creates a bright magenta
color. Click OK. (purple.jpg)
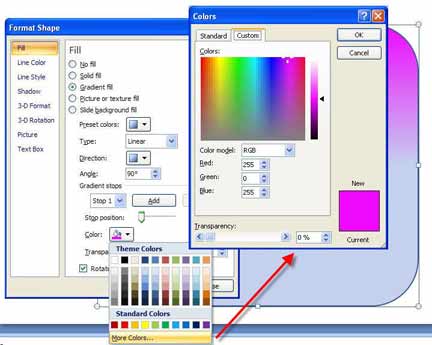
8. Choose Gradient Stop 2 from the Gradient stops dropdown.
9. Move the stop position slider to 100%.
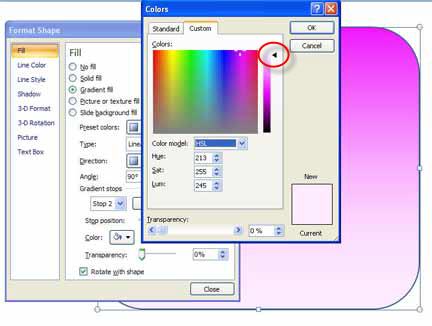
10. Open the color picker below Stop 2 and click More Colors to open the Colors dialog box.
11. Specify Red 255, Green 0, Blue 255.
12. Select the HSL color model.
13. Drag the arrow upward on the slider toward white until it becomes the
lightest magenta you can manage. Or type a larger number into the Luminosity settings box. Click OK to apply the
color.
(back to
gradient tutorial links)
(back to
top)
Semitransparent
Gradient
It's
helpful to place an object underneath the gradient so you can actually see the
transparency. Draw
an arrow (Insert | Shapes | Down Arrow) on your slide, then add a shape with the
default gradient fill. Follow steps 1-3 above if you
don't know how to do this. The
shape with the gradient fill should be on top of the arrow. You should also
remove the shape outline from the gradient-filled shape. (To do this, click
Drawing Tools Format |
Shape Outline | No Outline.) To
make the default gradient fade into the background, follow these steps: 1. Choose Stop 3 from the
Gradient stops dropdown. 2. Move the Transparency slider
to 100%. 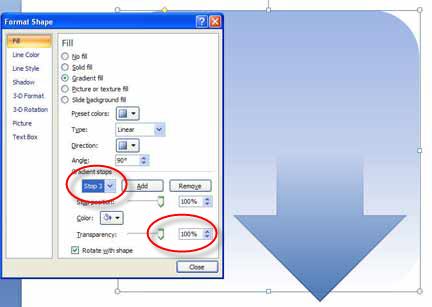
3. Choose Stop 2 from the
Gradient stops dropdown. 4. Move the Transparency slider
to 50%.
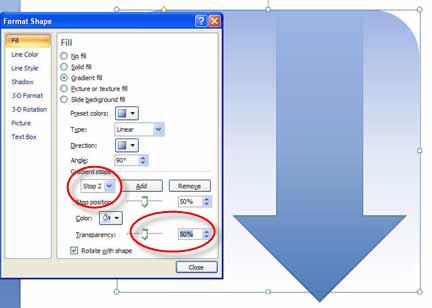
Adjust
the transparency of Stops 2 and 3 until you achieve the effect you need.
(back to
gradient tutorial links)
(back to
top)
|


